
This article explains how to replace hydraulic disc brake pads. We also take a look at how to troubleshoot rubbing disc brake pads and how to perform a simple bleed afterwards to fix soft brakes.
We’re using Shimano GRX brakes here, but we’ll explain some of the differences for other makes and models – be sure to check manufacturers’ guides if you need to. The principles are the same for replacing pads on cable-operated disc brakes, too, but the method for alignment is different.
You can’t always feel when your pads need replacing, so ideally check them periodically, and replace them when the pad material gets to 1-2mm thick – especially if you’ve got an important ride or race coming up. To check their wear levels, peer into the caliper and see how far the piston has pushed out, or pop the pads out and have a look.

In the worst case scenario, they’ll be so worn down you’ll hear the metal spring clip scraping against your rotors with a metallic 'ting', or the brakes may start to feel spongy. If that's the case, you'll may well like to read our guide to the best MTB disc brake pads and possibly our round-up of the best mountain bike disc brake rotors too.
Let’s get started.
- A new set of brake pads
- A large flat-bladed screwdriver or pad tool
- Isopropyl alcohol or disc brake cleaner
- Cleaning cloths
- Allen keys
- Grease
1. Check how worn the disc brake pads are

The pads in the picture above aren’t too worn, but I has a big ride coming up, so we’re replacing them to be on the safe side. The arrow shows how far the pistons have pushed out to compensate for pad wear.
2. Push the pistons in

As the disc brake pads wear down, the pistons auto-adjust to keep the pads close to the rotor. Gently push the pistons back flush with the brake housing to make space for the new pads.
Top tip: leave the old pads in to protect the pistons while you do this. If you’re going to throw the old pads away, you can use a flat-blade screwdriver. If you must take the pads out, use only a proper pad spreader or flat plastic tool against the pistons.
(Cable brakes adjust differently and in a variety of ways – check your manufacturer’s instructions.)

Here you can see the pistons are flush against the brake housing.
If the pistons just won’t stay flush, the seals inside may have perished – this is more common on SRAM brakes. Try a lever bleed first (below); if that doesn’t help, ask your local bike shop to have a look.
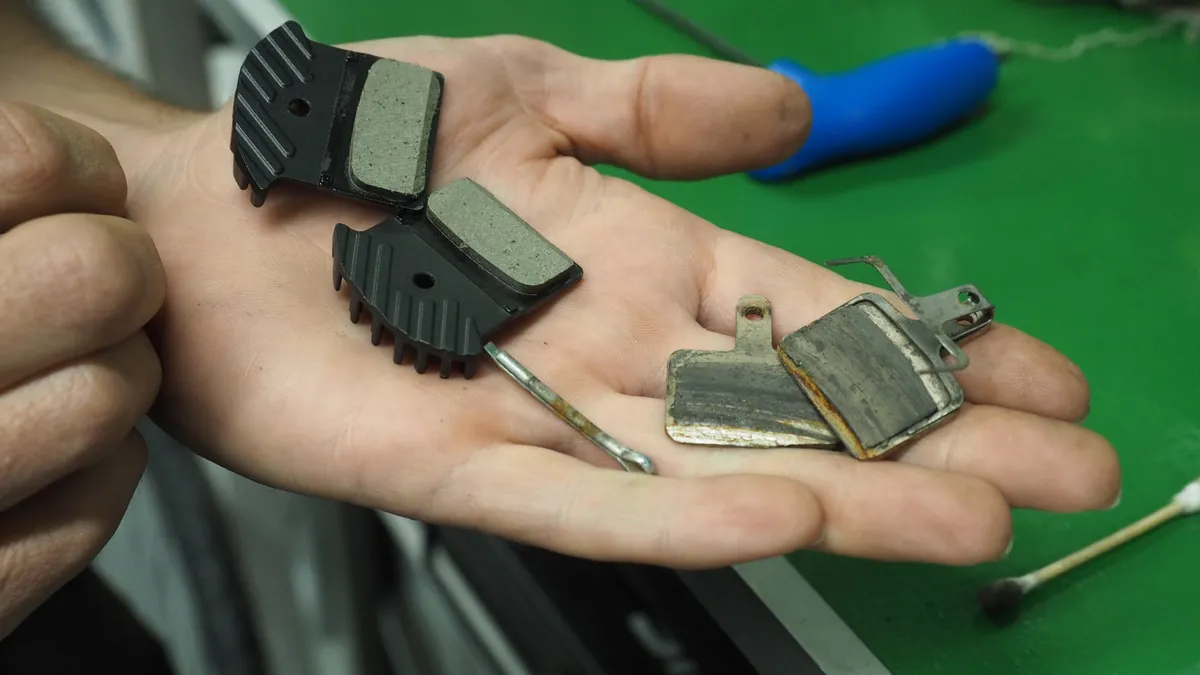
3. Remove the disc brake pads

Remove the retaining clip on the retaining bolt that holds the pads in place, and carefully unscrew the bolt.
Some brakes have a long split pin instead of a bolt. On these, close the splayed end of the pin with pliers before removing.
4. Clean everything


Use some disc brake cleaner or isopropyl alcohol to clean inside the brake housing using a lint-free rag and/or cotton buds. Clean the rotors too, and make sure you use a super-clean rag to avoid any contamination of the braking surface.
5. Put the new disc brake pads in

Gently slide the new pads into the housing. Check your brakes' instructions as each manufacturer has a different pad retention mechanism. Some load from the top of the caliper and others from the bottom, while some use a small clip to keep the pads in place, and others use magnets. The GRX calipers we have here, as with all Shimano brakes, use a metal spring clip between the pads and a retaining bolt.


Put a little grease on the retaining bolt first – the heat of the brakes can make some of these bolts seize easily, which is a real headache. Reinsert the retaining bolt or split pin. Replace the retaining clip onto the end of the bolt.
If it’s a brake with a split pin instead of a bolt, be sure to splay the end of the clip with pliers, to keep it in place.
Replace your wheels, and squeeze the brakes a few times to get the pistons to self-adjust towards the rotor.
6. Double check everything and bed in the pads
If the wheels spin smoothly, double check the brakes work strongly while still in the workstand, and that all the bolts are at the manufacturer’s recommended torque settings.
If the brakes rub or feel soft, check out the troubleshooting tips below.
Disc brake pads need bedding in when they're new, so when you’re happy that everything is safe and spinning freely, go out and spend 10 minutes repeatedly accelerating and then braking to walking pace, and then you’re good to go.
Troubleshooting: fixing brake rub

Everything should be aligned just fine if you’re putting the same wheel and rotor back on.
To fix minor rubbing, loosen and realign the caliper with the rotor. With the wheel still in, just loosen the bolts that mount the caliper to the frame, squeeze the brake lever and tighten the two bolts bit by bit while keeping the brake lever squeezed on.
If one piston is sticking and won’t move inwards properly, remove the wheel, *very* carefully squeeze the brake lever to bring the piston slightly beyond its normal position (not too far, else it will unseat itself), and then clean and lubricate it with brake fluid or special grease that matches the fluid in your system (mineral oil for Shimano, DOT 5.1 for SRAM). Then carefully push the pistons back with a flat plastic tool and repeat a few times until smooth.


Troubleshooting: bleeding soft brakes
If your brake action feels ‘soft’ even with new pads, you might have air in the system, which happens over time.
Here, we’ll just do a lever bleed, rather than a full fluid flush-through. This can be a home maintenance job, though as often, Shimano is simpler than SRAM.
For Shimano, you’ll need mineral oil, and a bleed funnel kit. For SRAM, you’ll need DOT 5.1 fluid, and a two-syringe bleed kit.
Some brands use DOT 4. With DOT fluid it's very important not to mix types, so unless you know exactly what's in there and what the process is, you'll be best off doing a full bleed or nothing. Mineral oil is a lot more forgiving.


Make sure your brake levers are at the highest point in your brake system, so any air makes its way there.
Peel back the lever hoods if your bike has them, and unscrew the bleed screw. Take care not to lose the o-ring.
For Shimano, carefully screw the bleed funnel into place, and half-fill with the appropriate brake fluid.
For SRAM, you’ll need to fit syringes at the lever and at the caliper end.
Put a bleed block in between the disc brake pads to stop them from closing, then gently pump the brake lever to encourage bubbles to float up through the system into the bleed funnel. Stop when there are no more bubbles, then put the funnel stopper in place and carefully unscrew it.
With SRAM, you will be gently moving fluid back and forth between the syringes, allowing bubbles to float to the top of the lever-end syringe.
Replace the bleed screw and its o-ring. Take care not to over tighten - it only needs around 2Nm.
Glen Whittington is a pro race team mechanic, frame builder and owner of aeightbikeco.com
